2023-Fall Advanced Cloud Computing Practice Assignment 2

Hosting Environment

image-20231027143343691

During the machine creation process, SSH passwords were used for authentication. All machines are part of the same virtual switch and the same security group, with all internal communications allowed.

Configuration Process

Basic Environment

Modify Hostname and Configure Hosts

The hostname for each machine has been generated during creation, so no modifications are necessary. Add the following entries to the /etc/hosts file of each host.

1
2
3
192.168.0.31 ceph1
192.168.0.32 ceph2
192.168.0.33 ceph3

Then, use ping to check the connectivity.

Configure Passwordless SSH Login

Generate an SSH key on the ceph1 machine and then manually distribute it to ceph1, ceph2, and ceph3. Finally, verify the availability of SSH.

Disable Firewall and SELinux

Turn off the firewall.

1
2
3
systemctl stop firewalld
systemctl disable firewalld
systemctl status firewalld

SELinux is turned off by default.

Configure NTP

Install NTP on each node.

1
yum -y install ntp

Sync the time of ceph2 and ceph3 nodes with ceph1. Modify the /etc/ntp.conf file on ceph2 and ceph3 nodes. Comment out the existing time servers and add ceph1 as the time server.

image-20231027150707776

Start the ntpd service on each node and check its status to ensure it is active.

1
2
systemctl start ntpd
systemctl status ntpd

On ceph2 and ceph3 nodes, confirm that the NTP server points to ceph1.

1
ntpq -pn

You should see output similar to the following:

1
2
3
4
5
[root@ceph2 ~]# ntpq -pn
remote refid st t when poll reach delay offset jitter
==============================================================================
*192.168.0.31 202.118.1.81 2 u 40 64 3 0.181 -0.477 2.802

1
2
3
4
5
[root@ceph3 ~]# ntpq -pn
remote refid st t when poll reach delay offset jitter
==============================================================================
*192.168.0.31 202.118.1.81 2 u 16 64 3 0.221 -0.623 0.046

Install Ceph

Configure Ceph Repository

Create a new file /etc/yum.repos.d/ceph.repo and set its content as follows:

1
2
3
4
5
6
[ceph]
name=Ceph
baseurl=http://download.ceph.com/rpm-octopus/el7/x86_64/
enabled=1
gpgcheck=1
gpgkey=https://download.ceph.com/keys/release.asc

Make sure to replace the baseurl with the appropriate URL for the version of Ceph you wish to install, if necessary.

1
2
3
4
5
6
7
8
9
10
11
12
13
14
15
16
17
18
19
20
21
22
23
24
[Ceph]
name=Ceph packages for $basearch
baseurl=http://download.ceph.com/rpm-nautilus/el7/$basearch
enabled=1
gpgcheck=1
type=rpm-md
gpgkey=https://download.ceph.com/keys/release.asc
priority=1
[Ceph-noarch]
name=Ceph noarch packages
baseurl=http://download.ceph.com/rpm-nautilus/el7/noarch
enabled=1
gpgcheck=1
type=rpm-md
gpgkey=https://download.ceph.com/keys/release.asc
priority=1
[ceph-source]
name=Ceph source packages
baseurl=http://download.ceph.com/rpm-nautilus/el7/SRPMS
enabled=1
gpgcheck=1
type=rpm-md
gpgkey=https://download.ceph.com/keys/release.asc
priority=1

Update the yum source.

1
yum clean all && yum makecache

Start Installing Ceph

Install Ceph for all nodes.

1
yum -y install librados2-14.2.10 ceph-14.2.10

On the ceph1 node, additionally install ceph-deploy. This step may be very slow and is highly dependent on network conditions.

1
yum install -y ceph-deploy

See the Ceph version installed on each machine.

1
ceph -v

Here comes an example from ceph3.

1
2
[root@ceph3 ~]# ceph -v
ceph version 14.2.10 (b340acf629a010a74d90da5782a2c5fe0b54ac20) nautilus (stable)

Deploy MON Node

The following steps need to be executed only on ceph1.

Use the following command to create the Ceph cluster:

1
ceph-deploy new ceph1

Create the Cluster

1
2
cd /etc/ceph
ceph-deploy new ceph1 ceph2 ceph3

Modify ceph.conf

1
vi /etc/ceph/ceph.conf

Append this to the end of the file.

1
2
[mon]
mon_allow_pool_delete = true

Initiallize and collect the initial credentials

1
ceph-deploy mon create-initial

Deploy and distribute the credentials

1
ceph-deploy --overwrite-conf admin ceph1 ceph2 ceph3

Deploy MGR node

The following steps need to be executed only on ceph1.

Deploy MGR node

1
ceph-deploy mgr create ceph1 ceph2 ceph3

Observe the cluster when it already starts.

1
2
3
4
5
6
7
8
9
10
11
12
13
14
15
16
[root@ceph1 ceph]# ceph -s
cluster:
id: d96f2b64-09d5-4363-ae37-8eea5e12cb05
health: HEALTH_OK

services:
mon: 3 daemons, quorum ceph1,ceph2,ceph3 (age 24s)
mgr: ceph1(active, since 9s), standbys: ceph3, ceph2
osd: 0 osds: 0 up, 0 in

data:
pools: 0 pools, 0 pgs
objects: 0 objects, 0 B
usage: 0 B used, 0 B / 0 B avail
pgs:

Deploy OSD node

At this point, it was discovered that additional data disks needed to be purchased for each server instance. Therefore, a 40GB cloud disk was added to each server, with the device name set as /dev/sdb. Below is an example of the result on ceph1.

image-20231027170302315

Huawei Cloud will prompt for disk initialization, but this is unnecessary. We do not need to partition or create a file system on these disks. After restarting the three machines, the ceph cluster will start automatically.

Let’s first display the disk status (using ceph1 as an example).

1
2
3
4
5
[root@ceph1 ~]# lsblk
NAME MAJ:MIN RM SIZE RO TYPE MOUNTPOINT
sda 8:0 0 40G 0 disk
└─sda1 8:1 0 40G 0 part /
sdb 8:16 0 40G 0 disk

Switch to the /etc/ceph directory on ceph1 and execute the following command to add the three newly added disks to the cluster.

1
2
3
ceph-deploy osd create ceph1 --data /dev/sdb
ceph-deploy osd create ceph2 --data /dev/sdb
ceph-deploy osd create ceph3 --data /dev/sdb

Here comes an example in ceph3.

1
2
3
4
5
6
7
8
9
[ceph3][WARNIN] Running command: /bin/systemctl enable --runtime ceph-osd@2
[ceph3][WARNIN] stderr: Created symlink from /run/systemd/system/ceph-osd.target.wants/[email protected] to /usr/lib/systemd/system/[email protected].
[ceph3][WARNIN] Running command: /bin/systemctl start ceph-osd@2
[ceph3][WARNIN] --> ceph-volume lvm activate successful for osd ID: 2
[ceph3][WARNIN] --> ceph-volume lvm create successful for: /dev/sdb
[ceph3][INFO ] checking OSD status...
[ceph3][DEBUG ] find the location of an executable
[ceph3][INFO ] Running command: /bin/ceph --cluster=ceph osd stat --format=json
[ceph_deploy.osd][DEBUG ] Host ceph3 is now ready for osd use.

At this point, you can check the status of the cluster to see the available space after deployment. Use the following command:

1
ceph -s

This command will provide you with the current status of the Ceph cluster, including information about the number of OSDs, the total and available space, and the health of the cluster. You should be able to see the newly added storage space reflected in the output.

1
2
3
4
5
6
7
8
9
10
11
12
13
14
15
[root@ceph1 ceph]# ceph -s
cluster:
id: d96f2b64-09d5-4363-ae37-8eea5e12cb05
health: HEALTH_OK

services:
mon: 3 daemons, quorum ceph1,ceph2,ceph3 (age 17m)
mgr: ceph2(active, since 16m), standbys: ceph1, ceph3
osd: 3 osds: 3 up (since 53s), 3 in (since 53s)

data:
pools: 0 pools, 0 pgs
objects: 0 objects, 0 B
usage: 3.0 GiB used, 117 GiB / 120 GiB avail
pgs:

Verification Process

Deploy RGW Node

Install RGW Component on All Server Nodes

1
yum -y install ceph-radosgw-14.2.10

Create RGW Instances

The following steps need to be executed only on ceph1.

1
ceph-deploy rgw create ceph1 ceph2 ceph3

Here comes the tail of the output.

1
2
3
4
5
6
7
8
9
10
[ceph3][DEBUG ] write cluster configuration to /etc/ceph/{cluster}.conf
[ceph3][WARNIN] rgw keyring does not exist yet, creating one
[ceph3][DEBUG ] create a keyring file
[ceph3][DEBUG ] create path recursively if it doesn't exist
[ceph3][INFO ] Running command: ceph --cluster ceph --name client.bootstrap-rgw --keyring /var/lib/ceph/bootstrap-rgw/ceph.keyring auth get-or-create client.rgw.ceph3 osd allow rwx mon allow rw -o /var/lib/ceph/radosgw/ceph-rgw.ceph3/keyring
[ceph3][INFO ] Running command: systemctl enable [email protected]
[ceph3][WARNIN] Created symlink from /etc/systemd/system/ceph-radosgw.target.wants/[email protected] to /usr/lib/systemd/system/[email protected].
[ceph3][INFO ] Running command: systemctl start [email protected]
[ceph3][INFO ] Running command: systemctl enable ceph.target
[ceph_deploy.rgw][INFO ] The Ceph Object Gateway (RGW) is now running on host ceph3 and default port 7480

Observe the status of the cluster.

1
2
3
4
5
6
7
8
9
10
11
12
13
14
15
16
17
18
[root@ceph1 ceph]# ceph -s
cluster:
id: d96f2b64-09d5-4363-ae37-8eea5e12cb05
health: HEALTH_OK

services:
mon: 3 daemons, quorum ceph1,ceph2,ceph3 (age 22m)
mgr: ceph2(active, since 22m), standbys: ceph1, ceph3
osd: 3 osds: 3 up (since 6m), 3 in (since 6m)
rgw: 3 daemons active (ceph1, ceph2, ceph3)

task status:

data:
pools: 4 pools, 128 pgs
objects: 190 objects, 2.7 KiB
usage: 3.0 GiB used, 117 GiB / 120 GiB avail
pgs: 128 active+clean

RGW has already launched successfully.

Create storage pools

Create storage pools

Create and observe a storage pool named pooltest.

1
2
3
4
5
6
7
8
9
10
11
12
13
14
15
16
17
18
19
20
21
22
23
24
25
26
27
[root@ceph1 ceph]# ceph osd pool create pooltest 32 32
pool 'pooltest' created
[root@ceph1 ceph]# ceph osd pool ls
.rgw.root
default.rgw.control
default.rgw.meta
default.rgw.log
pooltest
[root@ceph1 ceph]# ceph -s
cluster:
id: d96f2b64-09d5-4363-ae37-8eea5e12cb05
health: HEALTH_OK

services:
mon: 3 daemons, quorum ceph1,ceph2,ceph3 (age 24m)
mgr: ceph2(active, since 24m), standbys: ceph1, ceph3
osd: 3 osds: 3 up (since 8m), 3 in (since 8m)
rgw: 3 daemons active (ceph1, ceph2, ceph3)

task status:

data:
pools: 5 pools, 160 pgs
objects: 190 objects, 2.7 KiB
usage: 3.0 GiB used, 117 GiB / 120 GiB avail
pgs: 160 active+clean

Now the storage pool named pooltest has been successfully created.

Upload the file to the storage pool

1
2
3
4
5
6
7
8
9
10
11
12
13
14
15
16
17
18
19
20
21
22
23
24
25
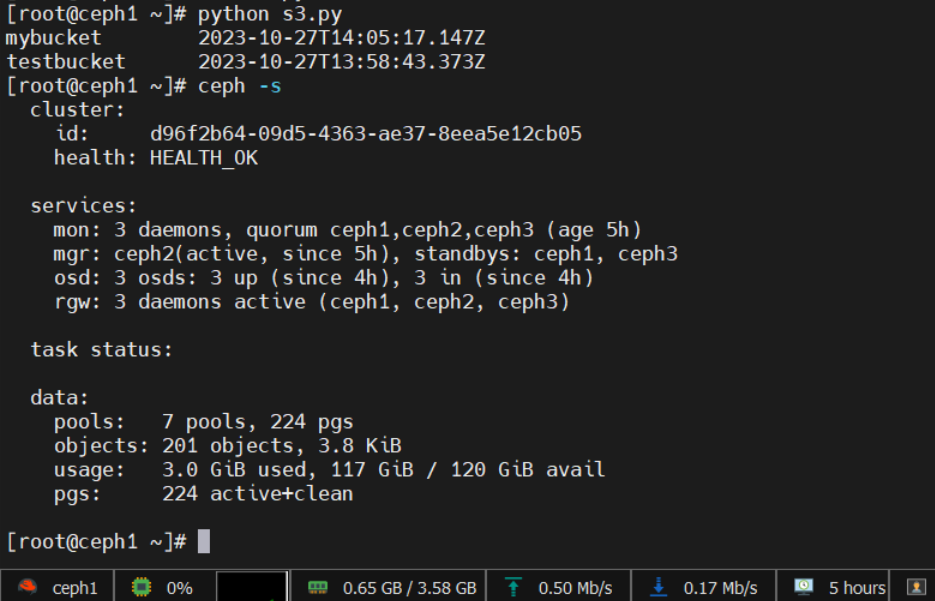
[root@ceph1 ~]# echo "hello world" > test.txt
[root@ceph1 ~]# rados -p pooltest put test ./test.txt
[root@ceph1 ~]# rados -p pooltest ls
test
[root@ceph1 ~]# rados -p pooltest ls -al
Please use --output to specify the output file name
[root@ceph1 ~]# ceph -s
cluster:
id: d96f2b64-09d5-4363-ae37-8eea5e12cb05
health: HEALTH_WARN
application not enabled on 1 pool(s)

services:
mon: 3 daemons, quorum ceph1,ceph2,ceph3 (age 4h)
mgr: ceph2(active, since 4h), standbys: ceph1, ceph3
osd: 3 osds: 3 up (since 4h), 3 in (since 4h)
rgw: 3 daemons active (ceph1, ceph2, ceph3)

task status:

data:
pools: 5 pools, 160 pgs
objects: 191 objects, 2.7 KiB
usage: 3.0 GiB used, 117 GiB / 120 GiB avail
pgs: 160 active+clean

Label the newly added storage pool.

1
2
3
4
5
6
7
8
9
10
11
12
13
14
15
16
17
18
19
20
[root@ceph1 ~]# ceph osd pool application enable pooltest rgw
enabled application 'rgw' on pool 'pooltest'
[root@ceph1 ~]# ceph -s
cluster:
id: d96f2b64-09d5-4363-ae37-8eea5e12cb05
health: HEALTH_OK

services:
mon: 3 daemons, quorum ceph1,ceph2,ceph3 (age 4h)
mgr: ceph2(active, since 4h), standbys: ceph1, ceph3
osd: 3 osds: 3 up (since 4h), 3 in (since 4h)
rgw: 3 daemons active (ceph1, ceph2, ceph3)

task status:

data:
pools: 5 pools, 160 pgs
objects: 191 objects, 2.7 KiB
usage: 3.0 GiB used, 117 GiB / 120 GiB avail
pgs: 160 active+clean

Thus, the files have been successfully uploaded and can be downloaded.

Download Files to Local
First, delete any existing local files, and then download the files from the storage pool using the following command.

1
2
3
4
5
6
7
8
9
[root@ceph1 ~]# ls
ceph-deploy-ceph.log test.txt
[root@ceph1 ~]# rm test.txt
rm: remove regular file ‘test.txt’? y
[root@ceph1 ~]# ls
ceph-deploy-ceph.log
[root@ceph1 ~]# rados -p pooltest get test ./test.txt
[root@ceph1 ~]# ls
ceph-deploy-ceph.log test.txt

Validate S3 Interface

Create RGW User

The following steps need to be executed only on ceph1.

Create a user named admin with access_key set to test1 and secret_key set to test1.

1
2
3
4
5
6
7
8
9
10
11
12
13
14
15
16
17
18
19
20
21
22
23
24
25
26
27
28
29
30
31
32
33
34
35
36
37
38
39
40
41
42
43
44
45
46
47
48
49
50
51
52
53
54
55
56
57
58
59
60
61
62
63
64
65
66
67
68
69
70
71
72
73
74
75
76
77
78
79
[root@ceph1 ~]# radosgw-admin user create --uid=admin --display-name=admin --access-key=test1 --secret-key=test1
{
"user_id": "admin",
"display_name": "admin",
"email": "",
"suspended": 0,
"max_buckets": 1000,
"subusers": [],
"keys": [
{
"user": "admin",
"access_key": "test1",
"secret_key": "test1"
}
],
"swift_keys": [],
"caps": [],
"op_mask": "read, write, delete",
"default_placement": "",
"default_storage_class": "",
"placement_tags": [],
"bucket_quota": {
"enabled": false,
"check_on_raw": false,
"max_size": -1,
"max_size_kb": 0,
"max_objects": -1
},
"user_quota": {
"enabled": false,
"check_on_raw": false,
"max_size": -1,
"max_size_kb": 0,
"max_objects": -1
},
"temp_url_keys": [],
"type": "rgw",
"mfa_ids": []
}

[root@ceph1 ~]# radosgw-admin user info --uid=admin
{
"user_id": "admin",
"display_name": "admin",
"email": "",
"suspended": 0,
"max_buckets": 1000,
"subusers": [],
"keys": [
{
"user": "admin",
"access_key": "test1",
"secret_key": "test1"
}
],
"swift_keys": [],
"caps": [],
"op_mask": "read, write, delete",
"default_placement": "",
"default_storage_class": "",
"placement_tags": [],
"bucket_quota": {
"enabled": false,
"check_on_raw": false,
"max_size": -1,
"max_size_kb": 0,
"max_objects": -1
},
"user_quota": {
"enabled": false,
"check_on_raw": false,
"max_size": -1,
"max_size_kb": 0,
"max_objects": -1
},
"temp_url_keys": [],
"type": "rgw",
"mfa_ids": []
}

Install and configure s3cmd

The following steps need to be executed only on ceph1.

Install s3cmd。

1
yum -y install s3cmd

Edit ~/.s3cfg , appending these content at the end of the file.

1
2
3
4
5
6
[default]
access_key = test1
secret_key = test1
host_base = ceph1:7480
host_bucket = ceph1:7480
use_https = False

Create and observe a bucket.

1
2
3
4
[root@ceph1 ~]# s3cmd mb s3://testbucket
Bucket 's3://testbucket/' created
[root@ceph1 ~]# s3cmd ls
2023-10-27 13:58 s3://testbucket

Upload and download file test

Continue using the previously created test.txt file to complete this part of the experiment.

1
2
3
4
5
6
7
8
9
10
11
12
13
14
15
16
17
18
19
20
21
22
23
24
25
26
27
28
[root@ceph1 ~]# s3cmd put test.txt s3://testbucket
upload: 'test.txt' -> 's3://testbucket/test.txt' [1 of 1]
12 of 12 100% in 1s 9.63 B/s done
[root@ceph1 ~]# s3cmd ls s3://testbucket
2023-10-27 14:00 12 s3://testbucket/test.txt
[root@ceph1 ~]# s3cmd get s3://testbucket/test.txt /usr/local
download: 's3://testbucket/test.txt' -> '/usr/local/test.txt' [1 of 1]
12 of 12 100% in 0s 296.71 B/s done
[root@ceph1 ~]# ll /usr/local/ | grep test.txt
-rw-r--r-- 1 root root 12 Oct 27 14:00 test.txt
[root@ceph1 ~]# ceph -s
cluster:
id: d96f2b64-09d5-4363-ae37-8eea5e12cb05
health: HEALTH_OK

services:
mon: 3 daemons, quorum ceph1,ceph2,ceph3 (age 4h)
mgr: ceph2(active, since 4h), standbys: ceph1, ceph3
osd: 3 osds: 3 up (since 4h), 3 in (since 4h)
rgw: 3 daemons active (ceph1, ceph2, ceph3)

task status:

data:
pools: 7 pools, 224 pgs
objects: 198 objects, 3.4 KiB
usage: 3.0 GiB used, 117 GiB / 120 GiB avail
pgs: 224 active+clean

Thus, the S3 interface now supports file uploads and downloads, and the cluster remains healthy.

Testing Phase

In this section, we will use a Python script to test the S3 interface. CentOS comes with python and python3 by default, so no updates are needed. First, install the necessary dependencies.

1
yum -y install python-boto

Next, create a Python file with the following content and run it. This script will create a bucket named mybucket. After running the script, you should see a message indicating that the bucket mybucket has been created successfully, and the cluster should remain healthy.

1
2
3
4
5
6
7
8
9
10
11
12
13
14
15
16
import boto
import boto.s3.connection
access_key = 'test1'
secret_key = 'test1'
conn = boto.connect_s3(
aws_access_key_id = access_key,
aws_secret_access_key = secret_key,
host = 'ceph1', port= 7480,
is_secure=False,
calling_format = boto.s3.connection.OrdinaryCallingFormat(),
)
bucket = conn.create_bucket('mybucket')
for bucket in conn.get_all_buckets():
print "{name}\t{created}".format(
name = bucket.name,
created = bucket.creation_date)

image-20231027220616025

At this point, the experiment is complete. Make sure to save the images of the three machines on Huawei Cloud for future use. After that, delete and release the resources to finalize this experiment.

image-20231027221536122